SSH Connection using Putty:
Windows does not come with a bundled SSH client by default. It is recommended that you use the freely available Putty utility, which can be downloaded from:
http://www.chiark.greenend.org.uk/~sgtatham/putty/download.html
You will need to get your SSH key in PPK format
Once you have your key in PPK format, you can connect following these steps:
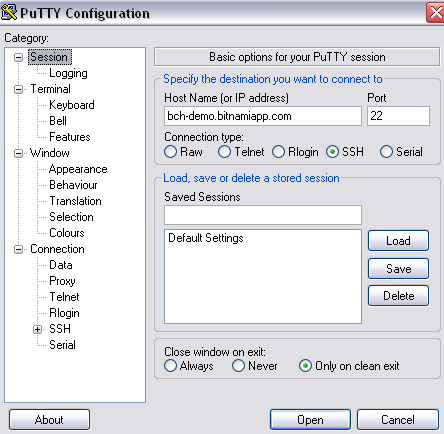
- Start Putty ( Start Menu -> Programs -> Putty -> Putty ).
- Enter your machine IP address or public domain name in the Session section. You can find out the hostname of a server by going to the Servers page, selecting the server and clicking ‘Manage Server’. The hostname will appear next to Public DNS and it will be similar to ‘xyz.bitnamiapp.com. Of course a server needs to be running so you can connect to it.
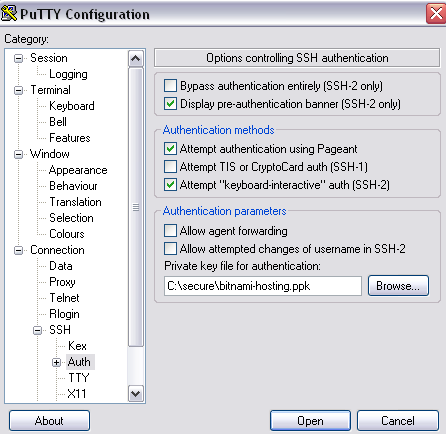
- Add your private SSH PPK key path.
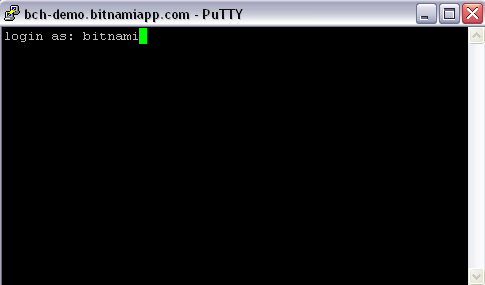
- Click “Open” to start the SSH session.
- Click “yes” to accept SSH key.
- Enter your login: bitnami
You can also simplify the above procedure and add your key to the special SSH agent. This way you will not have to provide your ssh key every time you connect.
- Start “Pageant” ( Start Menu -> Programs -> Putty -> Pageant ).
- Click “Add key” and choose the PPK file.
- Open “Putty” application ( Start Menu -> Programs -> Putty -> Putty ).
- Go to Connection -> Data using the left menu.
- Enter “bitnami” as the “Auto-login username”.
- Go to “Session”.
- Insert your server Public DNS (ec2-xyz.compute-1.amazonaws.com / xyz.bitnamiapp.com) in the “Host Name” field. You can find this in Server Management for BitNami Cloud Hosting servers or in the instance properties in Amazon console.
- Click “Open” to start the SSH session.
If you prefer to use putty from the command line you should include ‘-i’ and ‘-l’ options as follows:
> putty -i “C:\Path\To\bitnami-hosting.ppk” -l bitnami example.com
Upload Files ( Using FTP)
You should follow these steps to upload files using FileZilla:
- Get your SSH Key in PPK format
- Start FileZilla
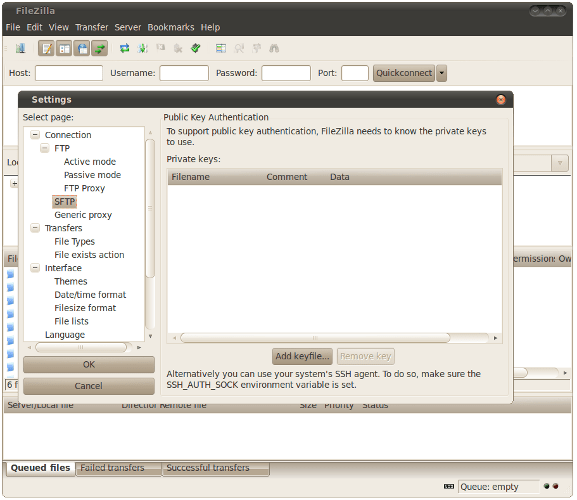
- Go to edit -> preferences
- Select SFTP
- Click “Add keyfile”
- Select the PPK file
- Save the settings (click OK in settings window)
- In the connection toolbar, enter:
- Host: the Public DNS ( xyz.bitnamiapp.com / ec2-xwz.compute-1.amazonaws.com)
- User: ‘bitnami’
- Password: leave it blank
- Port: 22
- Click “Quickconnect”
- If you get a message “The server’s host key is unknown”, click “ok” button
Connect Database Using Phpmyadmin
By default phpMyAdmin and phpPgAdmin are not accessible from the outside for security reasons. In order to access them, you can create an SSH tunnel to Apache, sending your requests to your webserver from 127.0.0.1 (localhost).
You should follow these steps to create the tunnel:
- Get your SSH private key if you don’t have it already.
- Create the tunnel (Use Putty).
- Follow the steps described SSH Connection using Putty above
- Before opening the connection. Go to Connection -> SSH -> Tunnels, enter the values below and click “Add” button:
- Source port: “8888”
- Destination: “localhost:80”
- Click Open
- While the tunnel is active you can connect to the web application at http://127.0.0.1:8888/phpmyadmin or http://127.0.0.1:8888/phppgadmin in your browser.
The default login is:- username: root (“administrator” for legacy versions) for MySQL or postgres for PostgreSQL database.
- password: bitnami (for BitNami AMIs), <application password> (for BitNami Cloud Hosting)